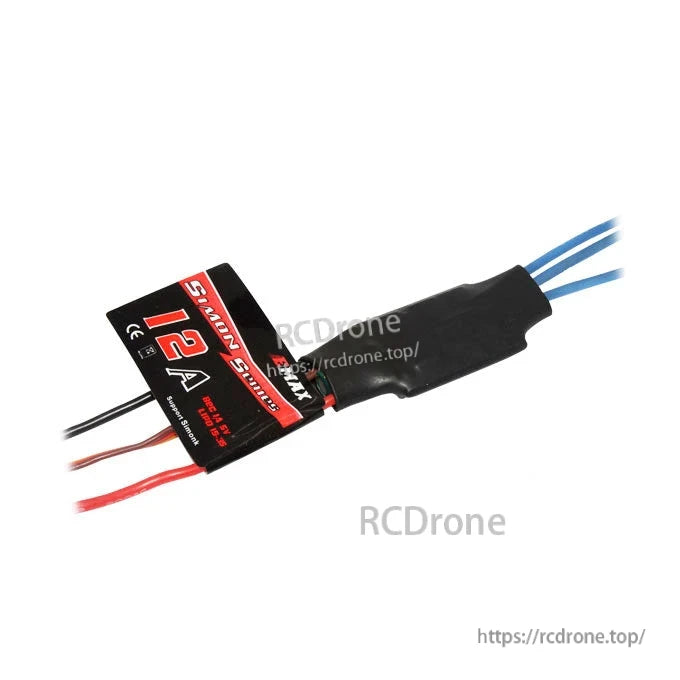
EMAX Simon Series 12A ESC Electronic Speed Controller for Multirotor, 1-3S Li-xx, 5V 1A BEC
EMAX Simon Series 12A ESC Electronic Speed Controller for Multirotor, 1-3S Li-xx, 5V 1A BEC
Emax
Couldn't load pickup availability
Overview
EMAX Simon Series 12A ESC (electronic speed controller) for multirotor applications, based on SimonK firmware and designed for responsive drive performance.
Key Features
- Based on SimonK firmware, further optimized for drive performance.
- Low-voltage protection, over-heat protection, and self-check functions.
- Separate power supply for MCU and BEC to enhance interference resistance.
- Parameters can be set via program card or transmitter.
- Throttle range can be set to be compatible with different receivers.
- Max speed: 210,000 rpm (2-pole), 70,000 rpm (6-pole), 35,000 rpm (12-pole).
Specifications (Simon-12A)
| Continuous current | 12A |
| Burst current (10S) | 15A |
| Li-xx battery (cell) | 1-3 |
| Dimensions (L*W*H) | 22*17*7 mm |
| Weight (wires included) | 8 g |
| BEC mode | Linear |
| BEC output | 1A/5V |
| Programmable | YES |
For setup and programming assistance, contact [email protected].
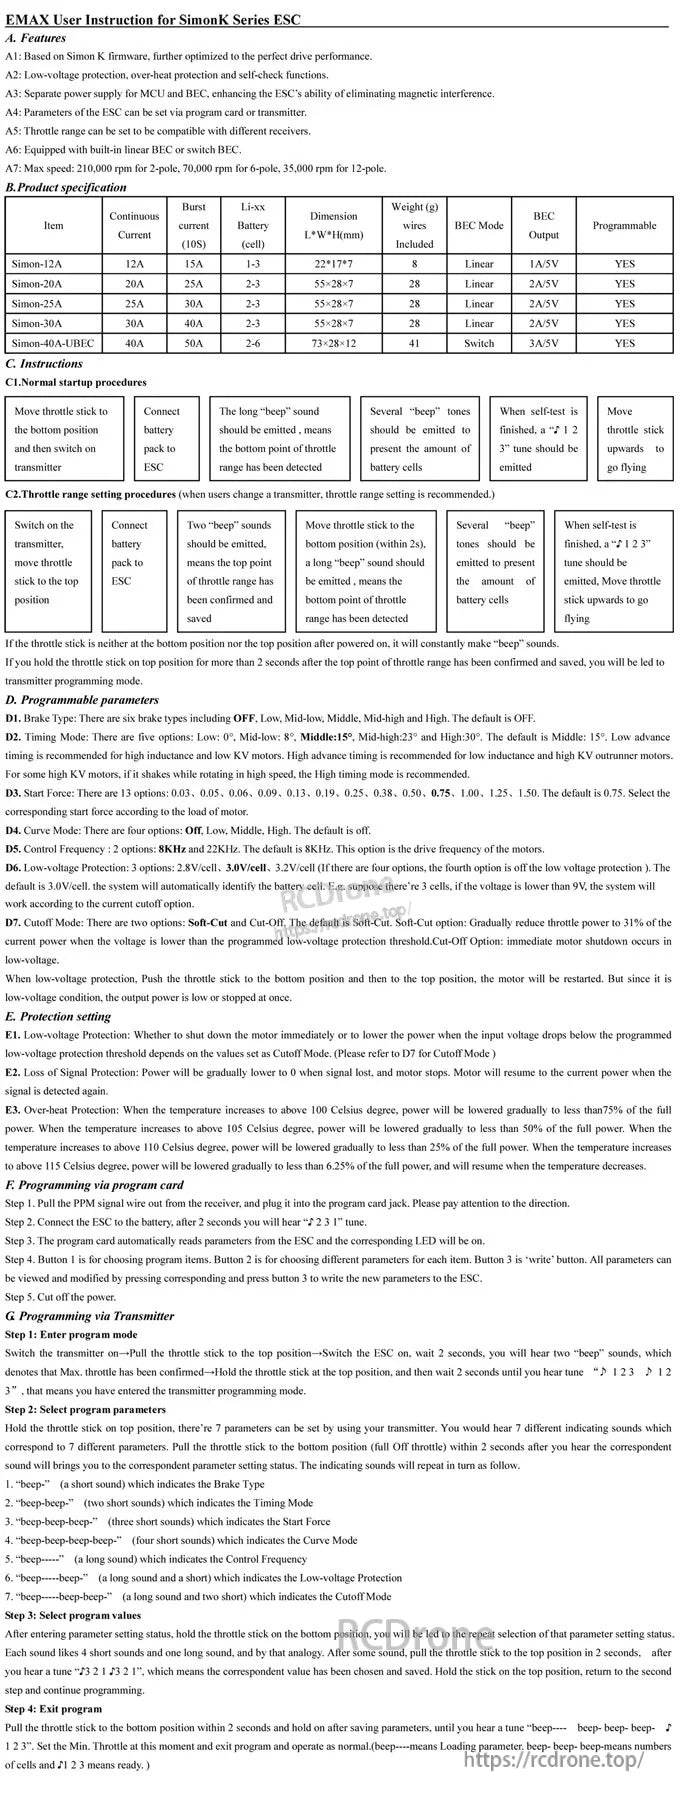
Instructions
Normal startup procedures
- Move throttle stick to the bottom position and switch on transmitter.
- Connect battery pack to ESC.
- The long “beep” sound should be emitted, meaning the bottom point of throttle range has been detected.
- Several “beep” tones should be emitted to present the amount of battery cells.
- When self-test is finished, a “♪ 1 2 3” tune should be emitted.
- Move throttle stick upwards to go flying.
Throttle range setting procedures
(When users change a transmitter, throttle range setting is recommended.)
- Switch on the transmitter, move throttle stick to the top position.
- Connect battery pack to ESC.
- Two “beep” sounds should be emitted, meaning the top point of throttle range has been confirmed and saved.
- Move throttle stick to the bottom position (within 2s), a long “beep” sound should be emitted, meaning the bottom point of throttle range has been detected.
- Several “beep” tones should be emitted to present the amount of battery cells.
- When self-test is finished, a “♪ 1 2 3” tune should be emitted. Move throttle stick upwards to go flying.
If the throttle stick is neither at the bottom position nor the top position after powered on, it will constantly make “beep” sounds.
If you hold the throttle stick on top position for more than 2 seconds after the top point of throttle range has been confirmed and saved, you will be led to transmitter programming mode.
Programmable Parameters
- Brake Type: six brake types including OFF, Low, Mid-low, Middle, Mid-high and High. Default: OFF.
- Timing Mode: five options: Low: 0°, Mid-low: 8°, Middle: 15°, Mid-high: 23° and High: 30°. Default: Middle (15°). Low advance timing is recommended for high inductance and low KV motors. High advance timing is recommended for low inductance and high KV outrunner motors. If it shakes while rotating in high speed, the High timing mode is recommended.
- Start Force: 13 options: 0.03, 0.05, 0.06, 0.09, 0.13, 0.19, 0.25, 0.38, 0.50, 0.75, 1.00, 1.25, 1.50. Default: 0.75. Select the corresponding start force according to the load of motor.
- Curve Mode: four options: Off, Low, Middle, High. Default: Off.
- Control Frequency: 2 options: 8KHz and 22KHz. Default: 8KHz. This option is the drive frequency of the motors.
- Low-voltage Protection: 3 options: 2.8V/cell, 3.0V/cell, 3.2V/cell (if there are four options, the fourth option is off of the low voltage protection). Default: 3.0V/cell. The system will automatically identify the battery cells. Suppose there’re 3 cells, if the voltage is lower than 9V, the system will work according to the current cutoff option.
- Cutoff Mode: Soft-Cut and Cut-Off. Soft-Cut: gradually reduce throttle power to 3% of the current power when the voltage is lower than the programmed low-voltage protection threshold. Cut-Off: immediate motor shutdown occurs in low-voltage. When in low-voltage protection, push the throttle stick to the bottom position and then to the top position, the motor will be restarted. But since it is low-voltage condition, the output power is low or stopped at once.
Protection Setting
- Low-voltage Protection: whether to shut down the motor immediately or to lower the power when the input voltage drops below the programmed low-voltage protection threshold depends on the values set at Cutoff Mode (please refer to Cutoff Mode).
- Loss of Signal Protection: power will be gradually lower to 0 when signal lost, and motor stops. Motor will resume to the current power when the signal is detected again.
- Over-heat Protection: when temperature increases to above 100°C, power will be lowered gradually to less than 75% of the full power. When temperature increases to above 105°C, power will be lowered gradually to less than 50% of the full power. When temperature increases to above 110°C, power will be lowered gradually to less than 25% of the full power. When temperature increases to above 115°C, power will be lowered to less than 6.25% of the full power, and will resume when the temperature decreases.
Programming
Programming via program card
- Pull the PPM signal wire out from the receiver, and plug it into the program card jack. Please pay attention to the direction.
- Connect the ESC to the battery, after 2 seconds you will hear “♪ 2 3 1” tune.
- The program card automatically reads parameters from the ESC and the corresponding LED will be on.
- Button 1 is for choosing program items. Button 2 is for choosing different parameters for each item. Button 3 is “write” button. All parameters can be viewed and modified by pressing corresponding and press button 3 to write the new parameters to the ESC.
- Cut off the power.
Programming via transmitter
Step 1: Enter program mode
Switch the transmitter on—Pull the throttle stick to the top position—Switch the ESC on, wait 2 seconds, you will hear two “beep” sounds, which denotes that Max. throttle has been confirmed—Hold the throttle stick at the top position, and then wait 2 seconds until you hear tune “♪ 1 2 3 ♪ 1 2 3”, that means you have entered transmitter programming mode.
Step 2: Select program parameters
Hold the throttle stick on top position, there’re 7 parameters can be set by using your transmitter. You would hear 7 different indicating sounds which correspond to 7 different parameters. Pull the throttle stick to the bottom position (full Off throttle) within 2 seconds after you hear the sound will brings you to the correspondent parameter setting status. The indicating sounds will repeat in turn as follow.
- 1. “beep-” (a short sound) which indicates the Brake Type
- 2. “beep-beep-” (two short sounds) which indicates the Timing Mode
- 3. “beep-beep-beep-” (three short sounds) which indicates the Start Force
- 4. “beep-beep-beep-beep-” (four short sounds) which indicates the Curve Mode
- 5. “beep-----” (a long sound) which indicates the Control Frequency
- 6. “beep-----beep-” (a long sound and a short) which indicates the Low-voltage Protection
- 7. “beep-----beep-beep-” (a long sound and two short) which indicates the Cutoff Mode
Step 3: Select program values
After entering parameter setting status, hold the throttle stick on the bottom position, you will be led to the repeat selection of that parameter setting status. Each sound likes 4 short sounds and one long sound, and by that analogy. After some sound, pull the throttle stick to the top position in 2 seconds, after you hear a tune “♪ 3 2 1 3 2 1”, which means the correspondent value has been chosen and saved. Hold the stick on the top position, return to the second step and continue programming.
Step 4: Exit program
Pull the throttle stick to the bottom position within 2 seconds and hold on after saving parameters, until you hear a tune “beep----- beep-beep-beep- beep-beep-beep- 1 2 3”. The Min. Throttle at this moment and exit program and operate as normal. (beep----- means Loading parameter. beep- beep- beep- means numbers of cells and ♪ 1 2 3 means ready.)
Details
Keep the setup card handy for quick reference on startup beeps, throttle calibration steps, and programmable brake/timing options.
Related Collections