EMAX Tinyhawk III user manual
https://rcdrone.top/products/emax-tinyhawk-iii-3
EMAX Tinyhawk III user manual Download
Thanks for purchasing the Tinyhawk III.

Please follow the instruction manual to assemble and configure your Tinyhawk.
Design in California, Made in China
Disclaimer
1.Please read the disclaimer carefully before using this product.
2.By using this product, you hereby agree to this disclaimer and signify that you have read them carefully and completely.
3.This product is not suitable for people under the age of 18. Adult supervision is highly recommended for kids under the age of 18.
4.Our Tinyhawk features open-source flight controller and Electronic Speed Controllers to meet the FPV enthusiasts' need to upgrade their quad.
5.Please read the instruction manual and warnings carefully. Before every flight, make sure the battery is fully charged and power connections are secure.
6.DO NOT fly around crowds, children, animals or objects.
7.EMAX ACCEPTS NO LIABILITY FOR DAMAGE(S) OR INJURIES INCURRED DIRECTLY OR INDIRECTLY FROM THE USE OF THIS PRODUCT.
Precautions
1.Please follow the instructions to assemble and to operate this product in a proper way.
- Pilots do not use this product if you have physical or mental illness, dizziness, fatigued, or use while under the influence of alcohol or drugs.
- Please fly in a safe area away from people
- Do not modify or use other parts and accessories not approved for the use of EMAX.
- Do not use this product in harsh environments (such as winds, rain, lightning, snow, etc.).
- Do not use this product in a strong electromagnetic environment.
Product specification
|
|
Tinyhawk III |
|
|
Wheelbase |
|
76mm |
|
Maximun Size |
|
L*W*H=105x105x45mm |
|
Weight(Without battery) |
|
32g |
|
Motor |
|
TH0802 II 15000KV |
|
Propeller |
|
Avia TH Propeller |
|
Main board |
|
F4( STM32F411 firmware ) 4in1 /5A ESC EMAX Tiny Receiver( SPI/Frsky_D8 ) |
|
Camera |
|
RunCam Nano 4 Camera |
|
VTX |
|
200-100-25mW 37CH (Adjustable frequency) Support SmartAudio |
|
Battrey |
|
1S HV 450mAh |
|
|
EMAX E8 Transmitter |
|
|
Maximun Size |
|
L*W*H=150x140x45mm |
|
Weight(Without battery) |
|
260g |
|
Number Of Channels |
|
8CH |
|
Frequency |
|
2.4GHz(2400MHz-2483.5MHz) |
|
Out put |
|
22dbm |
|
Battrey |
|
18650 Lithium ion battery |
|
Charging System |
|
Built in USB 5V--1A linear lithium ion battery charging system |
|
Working Voltage |
|
4.2V-3.3V |
|
External interface |
|
Micro USB,3.5mm Audio interface (wired coach interface) |
|
|
EMAX Transporter 2 |
|
|
Maximun Size (Without antenna,Folded) |
|
L*W*H=155x100x90mm |
|
Weight(With battery) |
|
398g |
|
Screen resolution |
|
480X800 |
|
Screen size |
|
4.3 inch |
|
Battrey |
|
1300mAh Lithium ion battery |
|
Working Voltage |
|
4.2V-3.7V |
|
Frequency |
|
5.8GHz(5658MHz-5945MHz) |
|
Charging System |
|
Built in USB 5V--1A linear lithium ion battery charging system |
|
DVR |
|
32G TF card(max),MJPEG,AVI |
|
Video |
|
VGA/D1/HD Off/3min/5min/10min |
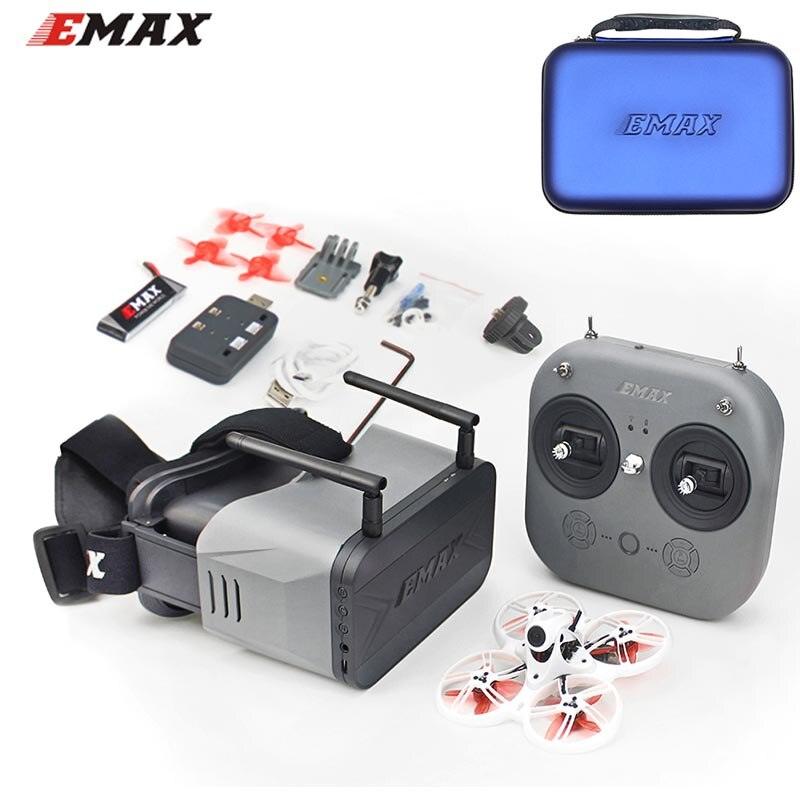
Product list
1.Tinyhawk III ................................................×1
2.EMAX E8 Transmitter............................ ×1
3.EMAX Transporter 2 ...............................×1
4.Emax 1s HV 450 mAh ............................×1
5.Charger .......................................................×1
- ................................................... (2XCW, 2XCCW)
- Accessory package.................................. X1
1.E8 Transmitter
1.1 E8 Transmitter
1.2 Power on & off
Press and hold the power button while the center indicator light turns on red. After 2 seconds, the center indicator light turns from red to green, and it powers on.
Press and hold the power button, after 2S, the center indicator will go out, and it will shutdown.
1.3 Binding & Unbinding
The E8 Transmitter has been bound with Tinyhawk III in the RTF kit. If it is necessary to bind, please follow the steps below:
- Enabling Bind Mode: Turn on the power and after the Tinyhawk III starts, press and hold the bind button to make the Tinyhawk III enter Bind Mode. When the blue indicator light of the Tinyhawk III flight controller flashes, this is indicating that it has entered Bind Mode.
- E8 Transmitter enters binding mode: first turn on the E8 Transmitter, then press the "L4+" & "R3-" buttons at the same time, and hold down for 2S until the center indicator turns from green to red, and the center indicator turns to green Flashes alternately with red, indicating that the remote control has entered the binding mode.
- Check that when the blue light on the Tinyhawk III flight control board changes from steady light to flashing, it means that the binding has been completed. Then press the "L4+" & "R3-" buttons on the E8 Transmitter at the same time again, and the blue light flashes again Turns to steady light, indicating that the binding has been completed.
- Unbinding: Unplug the battery of Tinyhawk III to power off and leave Bind Mode.
1.4 Mode switching
D8 mode: press the power switch and the "L1+" button at the same time: turn on and enter D8 mode, then the mode indicator will turn solid red.(Emax recommends D8 mode) D16 mode: press the power switch and the "L2-" button at the same time: turn on and enter D16 mode, then the mode indicator light will turn solid green.
D16 LBT mode: Press the power switch and the "L4+" button at the same time: Turn on the controller and enter D16 LBT mode, then the mode indicator light will turn solid yellow.
1.5 Gimbal Trim
Each joystick has a corresponding Trim button. Each Trim button adjusts the direction of the corresponding joystick control. Each time it is adjusted, a beep will sound. When it is adjusted to the center position, it will make a longer beep. Please pay attention to the sound. With joysticks centered, use the Trim buttons until the drone is steadily hovering in place.
1.6 Calibration of joystick
The E8 Transmitter is pre-calibrated, but recalibration can help solve some common issues:
- With the E8 Transmitter turned off, press the "L3-" button and the power button at the same time as the controller turns on.
- Wait for the center indicator to light up and change from fast flashing to slow flashing, and push the joysticks of E8 Transmitter to the maximum travel in the four directions up, down, left, and right.
- Press the "L3-" button, the prompt will sound, exit the calibration mode, and the E8 Transmitter will then boot up.
1.7 Changing Transmitter Modes
Remove the screw and open the back cover of the E8 Transmitter housing. There is a toggle switch on the left side of the board. Set the toggle switch to "L" (left-hand throttle mode) or "R" (right-hand throttle mode), and swap the positions of the levers (the 6Pin cable connecting the joystick to the main board does not need to change positions). Left-handed mode: E8 Transmitter left stick, controls the throttle and yaw direction of Tinyhawk III; E8 Transmitter right stick, controls Tinyhawk III's pitch and roll.
Right-handed mode: E8 Transmitter left stick controls the pitch and roll of Tinyhawk III; E8 Transmitter right stick controls the throttle and yaw direction of Tinyhawk III.
Schematic diagram of the left and right-handed joysticks (the picture shows the lefthanded mode, and of the joystick control reversed in the right-handed mode)
1.8 Trainer Port for Simulators
Insert one end of 3.5mm male to male into the trainer port (3.5mm audio interface), and plug the other end into the simulator (sold separately) to output the corresponding channel value.
Plug the micro USB cable into the remote control to output the corresponding channel value.
1.9 Battery & Charging
The E8 Transmitter is compatible with a 18650 battery, with a working voltage of 4.3V3.3V. When you need to reinstall the battery, remove the battery compartment cover and install the battery according to the correct polarity (the negative pole is on the spring side of the battery compartment). Confirm that the battery compartment cover and the battery compartment are perfectly matched then push forward until locked. If the battery is not installed correctly, charging and starting cannot be performed correctly.
The remote control is charged with the micro USB at the bottom. After the USB cable is inserted, the power charging indicator status:
When the indicator light is solid red: charging
Solid green indicator light: charging is full
Note: Use 5V-1A adapter for charging and micro USB cable for charging. When the voltage is low (3.3V), it will alarm. Please charge when battery is low.
2.Transporter 2(with DVR) 2.1Transporter 2
- Eye Adjustment Slots
- Frequency band switch button
- Channel switch button
- Video button
- Audio interface
- Micro USB
- Recording indicator 8. Charging indicator
- Antenna
- Auto Channel Search Button
- Turn on/off (long press) & menu button (short press)
- Reset switch
- Micro SD card slot
- Eye Distance Adjustment
- Sponge pad
- Tripod Screw Mount
In order to operate Transporter 2 correctly, you need to do the following:
- Install the included antenna on the SMA connector.
- Please extend the antenna and check the goggle is fully charged when putting them on.
2.2 Power on & off
Press and hold the power switch/menu button for 2 seconds, the display will light up and it will power on.
After pressing and holding the power switch/menu button for 2 seconds, the display goes out and it will shutdown.
2.3 Video channel selection
Transporter 2 has frequency band selection button B and channel selection button C. The two buttons can manually select the correct frequency band and channel. When the frequency band/channel is cycled, the channel value and frequency will be displayed in the upper left corner of the screen.
Frequency band selection button B: each short press to switch a frequency band; the switching sequence is ABEFR; for example, the current frequency band is E, short press the B button for the first time to switch to the E frequency band, short press the B button for the second time to switch to the F frequency band, and the third time Short press the B button to switch to the R band, and continue to cycle.
Channel selection button C: each short press to switch a channel, a total of 8 channels, cyclically reciprocating;
Tip: Make sure the Tinyhawk III is powered on, and when going through the channel cycle, select the correct channel and frequency band.
Note:
- Before adjusting the parameters, you must press and hold the CH button or FR button for 3 seconds.
- Make sure that the power of Tinyhawk III is turned on. When changing channels, it will be easier to find the correct channel through the video information of Tinyhawk III.
Note: Please make sure that Transporter 2 is on the correct channel where Tinyhawk III is on. The currently selected Tinyhawk III frequency band and channel are displayed in the upper left corner of the screen.
2.4 Video channel Auto Search
There is an automatic search function "A" on Transporter 2 to help find which channel the Tinyhawk III is on. Power on the Tinyhawk III first, then press the "A" button on the Transporter 2 to start the auto search mode. This mode will search all channels and select the channel with the best video reception. After searching all channels, the best channel number, frequency group and frequency will be displayed in the upper left corner of the screen.
Warning: If there are multiple Tinyhawk III (or other drones' image transmission) working at the same time, using this function may select the wrong drone channel. We recommend selecting the correct channel manually to prevent false matches.
2.5 Turn on & turn off recording
- Short press the R button on the right side in order to begin recording DVR. The top middle position on the display will show a red dot indicating the DVR is on. A DVR red LED will also turn on indicating the DVR is ready to record. When the Red Display Dot and Red LED begin flashing, the DVR will then be recording.
- When the DVR is recording, short press the R button to stop recording, indicated by the Red Display Dot and Red LED turning off.
Video Clip Length: Open the Menu and select RecTime in order to select the length of each video clip from the DVR. Optional: 3min, 5min, 10min, off.
2.6 Card recording parameter setting
Short press the M button on the left to call up the screen/card record parameter setting menu; (TF card needs to be purchased separately)
- Short press the left M button again to select the RecTime submenu and press the left M button each time to select the next submenu;
- Short press the B/C button on the right to select the appropriate parameter.
2.7 Screen parameter setting
Single key "M" will open the menu, you can adjust the brightness, contrast, saturation and language. After entering the menu, press the menu key "M" once to select the next menu option. By highlighting the currently selected menu, you can press the "B" button and the "C" button to adjust the increment and decrement. If no key input is detected, the menu will automatically close after 3 seconds.
2.8 Battery & Charging
Transporter 2 is pre-installed with a 1300mAH lithium battery. If you need to reinstall or replace the battery, please open a support ticket on our official website for help. Do not open the back cover yourself to avoid damage to the product. Doing so will void warranty.
Use 5V-1A adapter and micro USB cable for charging, after inserting the USB, the charging indicator status:
Solid red indicator light: charging
Solid green indicator light: charging is over
Tip: The upper right corner of the Transporter 2 display shows the battery level. When the display shows "Insufficient battery", please charge it in time, otherwise the Transporter 2 will shut down quickly.
3.Tinyhawk III propeller
3.1Tinyhawk III
3.2 Propeller installation & removal
The Tinyhawk III propeller has two directions of rotation: clockwise (CW) and counterclockwise (CCW). When purchasing a set of propellers, please purchase 2 clockwise blades and 2 counterclockwise blades. The blade rotates along the blunt edge of the blade. When installing the propeller blade, please install it in the correct direction of the propeller blade as shown in the figure below.
Propeller installation
Align the 3 shafts of the propeller with the 3 shafts of the motor, supporting the back of the motor, then press the blade in by hand until it is flush with the motor shaft.
Note: If the propeller is installed incorrectly, the Tinyhawk III cannot fly normally and cannot be controlled. Please carefully check whether the propeller is in the correct direction; if there is no support on the back of the motor, it may cause the frame to break; pay attention to safety when installing the propeller.
Use a small tool (such as a 1.5mm hex wrench or a small screwdriver) to press on the metal at the bottom of the motor and Tinyhawk III. Grasp the blade of the propeller with your fingers until the propeller pops out of the motor.
Note: It is only necessary to disassemble the propeller when replacing a new propeller; pay attention to safety when dismantling the propeller and when using tools.
4.Tinyhawk III VTX
4.1Tinyhawk III VTX
4.2 Changing VTX setting via Betaflight OSD
Tinyhawk III is equipped with SmartAudio and is already configured with stock settings. The SmartAudio line is operated on UART 2 TX.
Follow the prompts on the screen to enter the main setting menu. The throttle is in the middle, the direction is to the left, and the pitch is up (THROTTLE MID+ YAW LEFT+ PITCH UP) to enter the OSD parameter adjustment menu, as shown in Figure 1.
In the menu interface, switch the pitch up/down (PITCH) and select the menu option. Move the cursor to "FEATURES" and stir the ROLL lever to the right to enter the next menu. as shown in Figure 2. Use the PITCH joystick to move the cursor to "VTX SA", as shown in Figure 3. Then pull the roll (ROLL) lever to the right to enter the VTX configuration menu, as shown in figure4.
In the menu of VTX SA, we can configure BAND, CHAN and POWER. Pull the PITCH lever to move the cursor up and down to select the VTX option that needs to be set. Once the parameters are set, move the cursor to "SET", then turn the joystick to the right, enter "SET" and select "YES", turn the joystick to the right to save the set parameters, as shown in Figure 5.
In the VTX SA menu, move the cursor to "CONFIG" to enter the menu; move the cursor to "PIT FMODE" and pull the ROLL lever to the right to turn off the VTX power supply.as shown in figure6.
4.3Press the key to set the VTX channel
Note: You must "disable" the VTX Smart Audio on UART 2 in order for the pushbutton VTX adjustment to work as described below.
- Normal display
All LEDs on the VTX are normally off until the button is pressed. To check band and channel status click the button once quickly, and LED starts to indicate frequency band and frequency channel. First indicate the frequency band and then indicate the frequency channel. After both 2 rounds of LED display cycles, all LEDs will turn off. Menu Entry / Exit
(1)Press the button and hold for 5s to enter the menu. After entering the menu, BAND LED lights up.
(2)Press the button and hold for 5s again to save parameters and exit the menu. After saving and exiting the menu, all LED goes out.
Band and Channel parameter change
After entering menu, short click button to switch frequency group band(b)/frequency channel (C),and the LED of the corresponding menu is lit.
Enter/Exit Parameters
After choosing menu, press the button and hold for 2s to enter parameter option.
Notice: If you use SmartAudio to switch to an illegal channel, Tinyhawk III will not have image transmission. To switch back to a legal channel, press the button on vtx and follow the vtx menu guide shown below.
Default ≤ 25mW Output)
FCC: Ham radio license is required for use in North America.EU/CE: The frequency is restricted to prevent transmission outside the specified CE frequency.
Unlock configuration
FCC: Ham radio license is required for use in North America.
EU/Europe: Do not use unlock configuration.
E-band channels 4, 7, and 8 are restricted to prevent transmission outside the designated amateur radio frequencies. Adjustable video output power is only applicable to specific models.
* When the user purchases this product, it means that he/she understands these responsibilities and will operate the equipment legally. EMAX does not assume any responsibility for the user's purchase and/or use of this product in violation of government regulations.
5.Tinyhawk III Receiver
Tinyhawk III main control board contains four 5A electric regulators and an 8-channel receiver. The receiver is integrated into the main control board and set through betaflight.
5.1Tinyhawk III
Tinyhawk III receiver has 8 channels, its receiving mode is SPI Rx, and the default protocol is frsky_ D (D8)
Note: It is also compatible with Frsky_X (D16), but for best performance, EMAX strongly recommends using Frsky_D.
5.2 BINDING
Binding is the process of uniquely associating a particular receiver to a transmitter module. A transmitter module can be bound to multiple receivers (not to be used simultaneously). A receiver can only be bound to one transmitter module.
1.Hold the bind button while powering on the receiver. When the BLUE LED is on, it means the receiver is in BIND MODE
2.Turn on the transmitter, make sure it is set to D8 mode, and then set it into bind status. When the BLUE LED of the receiver starts flashing, it means bind successful.
3.Turn on the transmitter again, the BLUE LED receiver will be on, it means the receiver is receiving data from transmitter. Transmitter bind with receiver no need repetitive operation, unless you change either receiver or transmitter.
5.3 Other
The receiver can be instructed to enter the binding mode through the Betaflight configurator. Type the following command in the CLI tab: bind_rx
Click the Enter key, your receiver will enter the binding mode, and then follow the binding steps 2 and 3 to complete the binding process.
6. Tinyhawk III Flight Control Diagram
6.1 Tinyhawk III Flight Control Diagram
This flight controller has a MCU(STM32F411CEU6) with a MPU6000 gyro.
Tinyhawk III flight controller comes pre-programmed and properly tuned for optimal flight. For a full tune and configuration setting file (CLI dump file) please visit https://emaxusa.com/ for the CLI dump file.
6.2 Stock Flight Controller Settings
Tinyhawk III is configured to TAER1\2\3\4 Channel Mapping.
E8 Transmitter is used in the example below:
AUX 1 is a 3-level switch to select the flight mode; Acro, Horizon and Angle are activated in increasing order. The unlock switch of Tinyhawk III is set on AUX 1, and the highest value.
AUX 2 is configured as a buzzer. In the high level state, the motor will emit a beep. The auxiliary device 4 is set to a post-collision rollover mode (usually referred to as "turtle mode").
AUX 3 is configured as a buzzer to facilitate finding the position of the aircraft AUX 4 is configured as a buzzer turtle mode. AUX 4 is set in a high state in the following situations. Configure your E8 Transmitter as described above, or change these settings in the Betaflight Configurator.
6.3 PID
PID profile 1 is tuned and optimized for Tinyhawk III and Emax 1S HV 450 mAH for proper flight indoors and outdoors. Please do not change these values.
This configuration has been professionally adjusted by many parties, and EMAX strongly recommends not to change these values arbitrarily.
6.4Adjusting Software Settings (Betaflight Configurator)
Betaflight Configurator can be used to changed programmed settings on Tinyhawk III. Betaflight Configurator and flight controller firmware can be downloaded at https://github.com/betaflight/. The hardware target for Tinyhawk Flight Controller is MatekF411RX
DISCLAIMER:
We do not suggest changing any PID settings on TinyhawkIII or upgrading the firmware to new versions. Tinyhawk III comes stock with an optimal tune for superior flight performance. Changing this can affect flight time, overall speed, control of the aircraft, and excessive heat within the motors.
6.5Reprogramming Tinyhawk Flight Controller
1.Put the Flight Controller in DFU mode by pressing the BOOT button while plugging in the micro USB cable to a computer.
2.Select STM32F411 as the target and then select the firmware . Select Manual Baud Rate with 256000 in the drop down menu
3.Select Load Firmware(Online) to download the firmware
4.Select Flash Firmware to program the flight controller
6.6 Set the Correct Settings
Download the latest CLI Dump File from https://emax-usa.com/ Connect Tinyhawk to Betaflight configurator and select the CLI tab Open the CLI Dump File in a text editor and copy all the text.
Paste the settings into the command bar and press enter
Tinyhawk III will reconnect to Betaflight when completed
7. How To Fly Tinyhawk III
Before turning on the drone, please learn the controls first, and then turn on the drone. Be cautious when flying and operate in an open and controllable area.
(Take EMAX's E8 Transmitter and Transporter 2 Goggles as examples)
First turn on the power of E8 Transmitter and Transporter 2. Tinyhawk III has been bound to E8 Transmitter and matched with your Transporter 2 on the correct video channel. Turn on your Tinyhawk III by sliding the battery into the battery tray and plugging in the power source. After the battery is inserted, place the Tinyhawk III on a level and stable surface so that it can be calibrated.
Calibration takes a few seconds, and then Tinyhawk III can fly. Tinyhawk III can fly for up to 4 minutes when the battery is fully charged. When the battery power reaches 3.2v, please land the Tinyhawk III; flying longer will seriously damage your battery and is not recommended.
L
7.1 Lock&Unlock
Arming refers to setting Tinyhawk III to begin flying. When Tinyhawk III is powered on for the first time, it will not spin the propeller until it is armed.
- First move the throttle to the bottom position to control the aircraft,
- Then move the left switch of the E8 Transmitter to the third position.
When Tinyhawk III is successfully armed, you will see the propellers spinning.
Note: In the event of a collision, Tinyhawk III must stop flying immediately. Failure to stop the flight in time will damage Tinyhawk III. Before handling Tinyhawk III, be sure to switch the switch to an unarmed position. 7.2Flight Mode
The AUX 2 switch is set as a 3-level switch to change this mode. When AUX 2 is in the first position, Tinyhawk III will be in Angle Mode and stabilize the aircraft. When the switch is in the middle 2nd position, Tinyhawk III will be in Horizon Mode, allowing the drone to perform acrobatics by tilting roll or pitch all the way to the end. The third position is Rate Mode which will turn off Gyro Stablization which is recommended for experienced pilots who wish to perform acrobatics and professional maneuvers.
1.Beginner Mode (Angle Mode): The maximum angle of Tinyhawk III is limited during flight to help limit speed and make flying easier. In this mode, the control of the aircraft is based on attitude. The pitch and roll input from the remote control controls the pitch and roll angle of the aircraft. For example, a 20-degree tilt of the joystick will be converted into a 20-degree tilt of the Tinyhawk III.
- Intermediate mode (Horizon Mode): This mode has a higher angle limit and is used for higher speed flight with the same attitude control. The only difference is that at the end of the gimbal for pitch and roll, it will cause the aircraft to flip in that direction.
- Advanced mode (Rate Mode): This mode allows you to fully control the aircraft. There are no more angle restrictions, and control is based on rate. This means that the control input from the joystick sets a rotation rate on the axis.
Straight flight
To learn how to fly Tinyhawk III, you must first fly within sight (without wearing Transporter 2 Goggles). Turn on the power of Tinyhawk III and place it in a safe and empty room. Start Tinyhawk III, then use the left stick to raise the throttle to the hovering position. First try to maintain a stable altitude, the left and right thumbs control the throttle pitch angle of the joystick, so that the Tinyhawk III can fly normally. You need to practice many times until you have reached a level of proficiency.
7.3Advanced Flight-First Person View (FPV) Flight
After you have certain basic operating skills, you can try to fly with the Transporter 2. Make sure that the Tinyhawk III and Transporter 2 goggles are on the same VTX channel, choose an open and safe place to fly, and operate according to your experience. Control the throttle to keep the aircraft level and fly slowly, which makes it easier to learn to fly FPV. When you have enough flying experience, you can control Tinyhawk III freely in the air.
The Transporter 2 screen display (OSD) image data from the Tinyhawk III camera. OSD displays important information such as flight time and battery voltage. During the flight, please always pay attention to these numbers to understand the remaining battery time. Tinyhawk III can fly up to 4 minutes. When the battery reaches 3.2v, let Tinyhawk III land. It is not recommended that the battery voltage be below 3.2v, otherwise the battery will be damaged.
Warning: Try to maintain a controllable altitude flight. Do not slam the joystick when controlling Tinyhawk III, as this will make the aircraft difficult to control; do not let the battery be lower than 3.2v; when the default AUX3 switch is set to the second position (middle), A buzzer will be activated to find Tinyhawk III.
Thank you for purchasing our product!
Warning:REMINDER!Pleasepayattentiontosafetyofyour surrounding.NotRecommendedforpersonsunder18yearsofage!
1 comment
hola buenas , tengo el dron emax tinyhawk y despues de 4 usos al conectar la bateria ya no se enciende ni mete ruidos de que se ha encendido pero al conectarle el cable al ordenador si se enciende unas luce que parpadean en rojomorado y azul. hos agradeceria que me respondais lo antes posible ya que no me gustaria dejarlo de lado en caso de querer contactar para hablar mejor llamenme si fuera eficaz.
Gracias por su atencion.